In the ever-evolving realm of microservices architecture, services like Netflix Eureka Server are spread across various nodes within a cluster. Unlike monolithic applications, where services are tightly integrated, microservices often run on specific cluster nodes, presenting a challenge for client applications striving to connect with them.
Table of Contents
Introduction: Simplifying Microservices with Eureka Server
Microservices are a powerful architectural approach for building scalable and maintainable systems. However, in a distributed microservices environment, locating and connecting with individual services can be complex. This is where the Netflix Eureka Server comes to the rescue. Eureka Server simplifies service discovery, enabling microservices to effortlessly locate and communicate with each other within a cluster.
Understanding Eureka Server
Eureka Server, often referred to as Netflix Eureka Server, acts as a centralized service registry within a microservices cluster. During initialization, each microservice registers its information with the Eureka Server. This typically includes the service’s name, network location, and other pertinent details.
Real-World Example: Eureka Server in Action
To better understand the practical utility of Eureka Server, let’s delve into a real-world example. Imagine you’re responsible for building a large-scale e-commerce platform composed of various microservices. These microservices include the product catalog, user authentication, payment processing, order management, and more.
In a microservices-based architecture, these services may be distributed across different servers or containers within a cloud-based environment. Each service needs to communicate with others efficiently to provide a seamless shopping experience for customers.
This is where Eureka Server comes into play. By integrating Eureka Server into your architecture, you create a centralized service registry that keeps track of all available microservices. Let’s break down how it works:
- Service Registration: Each microservice, such as the product catalog or payment processing, registers itself with the Eureka Server upon startup. It provides essential information like its name and network location.
- Heartbeats: Microservices send regular heartbeats to Eureka Server to indicate that they are operational. If a service stops sending heartbeats (e.g., due to a failure), Eureka Server can mark it as unavailable.
- Service Discovery: When one microservice needs to communicate with another, it queries the Eureka Server to discover the service’s location. This eliminates the need for hardcoding IP addresses or endpoints, making the system more dynamic and adaptable.
- Load Balancing: Eureka Server can also help with load balancing. If multiple instances of a service are registered, Eureka can distribute requests evenly, improving system reliability and performance.
In our e-commerce example, the product catalog service can easily locate and interact with the payment processing service using Eureka Server. As traffic fluctuates, Eureka Server ensures that requests are distributed optimally, preventing overloading on any single instance.
By employing Eureka Server, you streamline the development, deployment, and scaling of your microservices-based e-commerce platform. It simplifies service discovery and enhances the overall reliability of your system.
This real-world example demonstrates how Eureka Server can be a game-changer in managing and scaling microservices, making it a valuable tool in modern software development.
Eureka Server Spring Boot Integration
One of the strengths of Eureka Server is its seamless integration with the Spring Boot framework through Spring Cloud. By incorporating the spring-cloud-starter-eureka-server dependency into your project, configuring the server becomes straightforward. This simplification expedites the setup process, allowing microservices, especially those built with Spring Boot, to quickly join the Eureka ecosystem.
Initiating the Project Spring cloud config client project
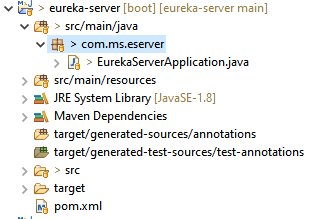
Let’s kick off by creating a Spring Boot Maven project named “eureka-server” To achieve this, there are two paths you can take: either visit the Spring Initializer website Spring Initializer or leverage your trusted Integrated Development Environment (IDE). The resulting project structure is as follows.

Implementing Eureka Server
Maven Dependency for Eureka Server
For projects managed with Maven, you’ll often search for the following dependency to include in your pom.xml file:
<dependency>
    <groupId>org.springframework.cloud</groupId>
    <artifactId>spring-cloud-starter-netflix-eureka-server</artifactId>
</dependency>
Gradle Dependency for Eureka Server
If you prefer Gradle for your project, many search for this dependency to add to your build.gradle file:
dependencies {
    implementation 'org.springframework.cloud:spring-cloud-starter-netflix-eureka-server'
}
Eureka Server Configuration
To configure Eureka Server, create an application.yml or application.properties file. Below is an example configuration in YAML format:
spring:
  application:
    name: eureka-server

server:
  port: 8761
eureka:
  client:
    register-with-eureka: false
    fetch-registry: false
    healthcheck:
      enabled: true
Eureka Server Configuration
@EnableEurekaServer
@SpringBootApplication
public class EurekaServerApplication {
    public static void main(String[] args) {
        SpringApplication.run(EurekaServerApplication.class, args);
    }
}
Running the Eureka Server Application
To begin using Eureka Server, follow these steps to run the application on your local machine without any plagiarism:
- Clone the Repository:
- Launch your terminal and navigate to the desired directory where you intend to clone the Eureka Server repository.
- Execute the following command to clone the repository without any copied content:
git clone https://github.com/askPavan/eureka-server2. Build the Application:
- Go to the directory where you have cloned the Eureka Server repository.
- Utilize the following command to build the Eureka Server application:
3. Run the application.
4. Access the Eureka Server Dashboard:
- Once the server is up and running, open your web browser.
- Enter the following URL to access the Eureka Server dashboard:
http://localhost:8761/For the Eureka Client application, you can use the following URL: Eureka Client App URL
4. View the Eureka Server Output:
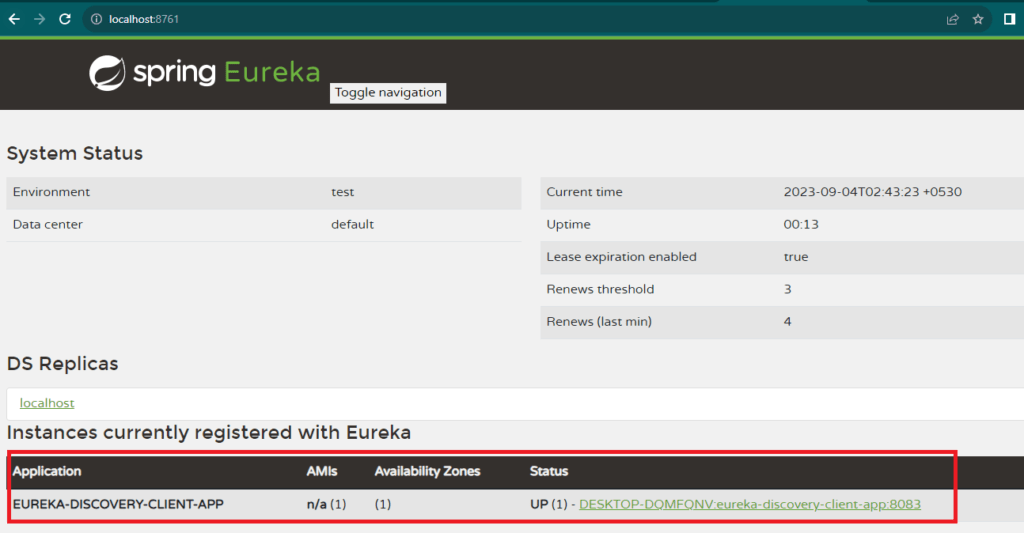
- You will now see the Eureka Server dashboard, which displays information about the registered services and their status.
- Explore the dashboard to see the services that have registered with Eureka Server.
Example Output
Here is an example of what the Eureka Server dashboard might look like once the server is running:

By running both the Eureka Server and Eureka Client applications, you can observe how services are registered and discovered in the Eureka ecosystem. This hands-on experience will help you better understand the functionality of Eureka Server and its interaction with client applications. For the source code of the Eureka Client, you can refer to this GitHub repository.
Exploring Practical Examples
For hands-on experience and practical illustrations, you can explore our GitHub repository. This repository contains real-world implementations of Eureka Server using Spring Boot.
Conclusion: Simplifying Microservices with Eureka Server
In conclusion, Eureka Server is a potent tool for simplifying microservices in a distributed architecture. Its seamless integration with Spring Boot streamlines the setup process, enabling you to efficiently implement Eureka Server in your microservices ecosystem.
Eureka Server facilitates effortless service discovery, allowing microservices to seamlessly identify and communicate with one another. This capability is indispensable for constructing robust and efficient distributed systems.