1. Introduction to Spring Boot API Gateway
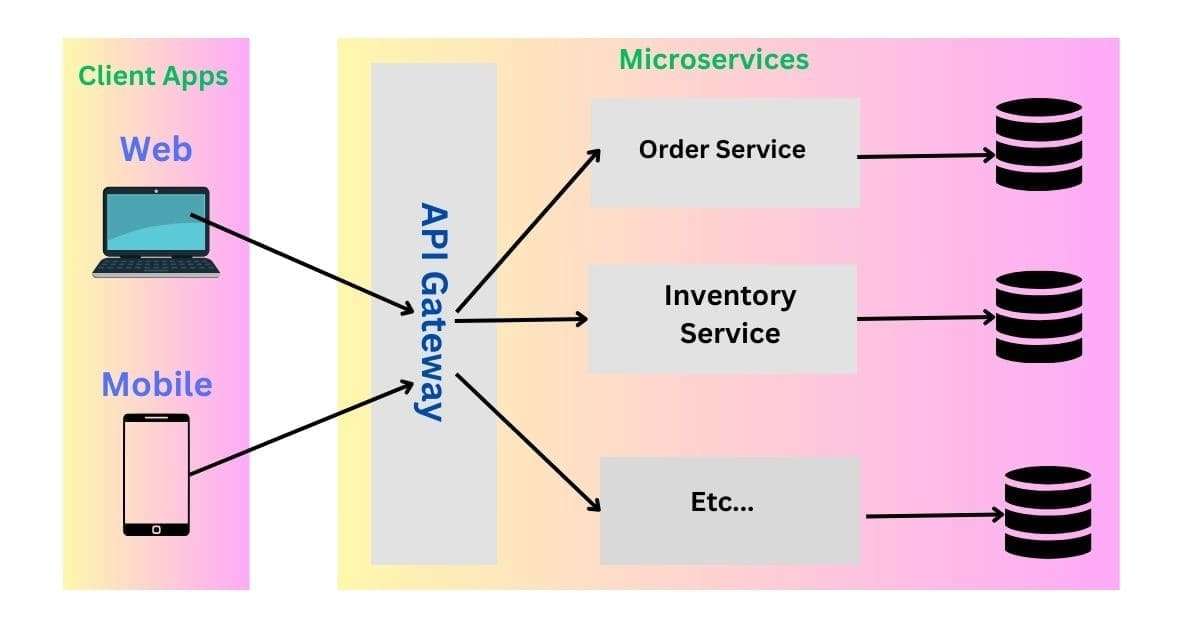
In this tutorial, we’ll explore the concept of a Spring Boot API Gateway, which serves as a centralized entry point for managing multiple APIs in a microservices-based architecture. The API Gateway plays a crucial role in handling incoming requests, directing them to the appropriate microservices, and ensuring security and scalability. By the end of this tutorial, you’ll have a clear understanding of how to set up a Spring Boot API Gateway to streamline your API management.
Table of Contents
2. Why Use an API Gateway?
In a microservices-based architecture, your project typically involves numerous APIs. The API Gateway simplifies the management of all these APIs within your application. It acts as the primary entry point for accessing any API provided by your application.

3. Setting Up the Spring Boot API Gateway
To get started, you’ll need to create a Spring Boot application for your API Gateway. Here’s the main class for your API Gateway application:
package com.javadzone.api.gateway;

import org.springframework.boot.SpringApplication;
import org.springframework.boot.autoconfigure.SpringBootApplication;
import org.springframework.cloud.client.discovery.EnableDiscoveryClient;

@EnableDiscoveryClient
@SpringBootApplication
public class SpringApiGatewayApplication {

	public static void main(String[] args) {
		SpringApplication.run(SpringApiGatewayApplication.class, args);
	}

}
In this class, we use the @SpringBootApplication annotation to mark it as a Spring Boot application. Additionally, we enable service discovery by using @EnableDiscoveryClient, which allows your API Gateway to discover other services registered in the service registry.
3.1 Configuring Routes
To configure routes for your API Gateway, you can use the following configuration in your application.yml or application.properties file:
server:
  port: 7777

spring:
  application:
    name: api-gateway
  cloud:
    gateway:
      routes:
        - id: product-service-route
          uri: http://localhost:8081
          predicates:
            - Path=/products/**
        - id: order-service-route
          uri: http://localhost:8082
          predicates:
            - Path=/orders/**
In this configuration:
- We specify that our API Gateway will run on port 7777.
- We give our API Gateway application the name “api-gateway” to identify it in the service registry.
- We define two routes: one for the “inventory-service” and another for the “order-service.” These routes determine how requests to specific paths are forwarded to the respective microservices.
3.2 Spring Boot API Gateway Dependencies
To build your API Gateway, make sure you include the necessary dependencies in your pom.xml file:
<dependencies>
    <dependency>
        <groupId>org.springframework.boot</groupId>
        <artifactId>spring-boot-starter-webflux</artifactId>
    </dependency>
    <dependency>
        <groupId>org.springframework.cloud</groupId>
        <artifactId>spring-cloud-starter-bootstrap</artifactId>
    </dependency>
    <dependency>
        <groupId>org.springframework.cloud</groupId>
        <artifactId>spring-cloud-starter-netflix-eureka-client</artifactId>
    </dependency>
    <dependency>
        <groupId>org.springframework.cloud</groupId>
        <artifactId>spring-cloud-starter-gateway</artifactId>
    </dependency>
</dependencies>
4. Running the Microservices
To complete the setup and fully experience the functionality of the Spring Boot API Gateway, you should also run the following components:
4.1. Clone the Repositories:
Clone the repositories for the services by using the following GitHub links:
If you’ve already created the API Gateway using the provided code above, there’s no need to clone it again. You can move forward with starting the services and testing the API Gateway as previously described. if not create api gateway you clone from this repo Spring Boot API Gateway Repository.
You can use Git to clone these repositories to your local machine. For example:
git clone https://github.com/askPavan/inventory-service.git
git clone https://github.com/askPavan/order-service.git
git clone https://github.com/askPavan/spring-api-gateway.git
git clone https://javadzone.com/eureka-server/
4.2. Build and Run the Services:
For each of the services (Inventory Service, Order Service, Eureka Server) and the API Gateway, navigate to their respective project directories in your terminal.
- Navigate to the “Services/apis” directory.
- Build the application using Maven:
mvn clean installYou can begin running the services by executing the following command:
java -jar app-name.jarPlease replace “app-name” with the actual name of your API or service. Alternatively, if you prefer, you can also start the services directly from your integrated development environment (IDE).
4.3. Start Eureka Server:
You can run the Eureka Server using the following command:
java -jar eureka-server.jarMake sure that you’ve configured the Eureka Server according to your application properties, as mentioned earlier.
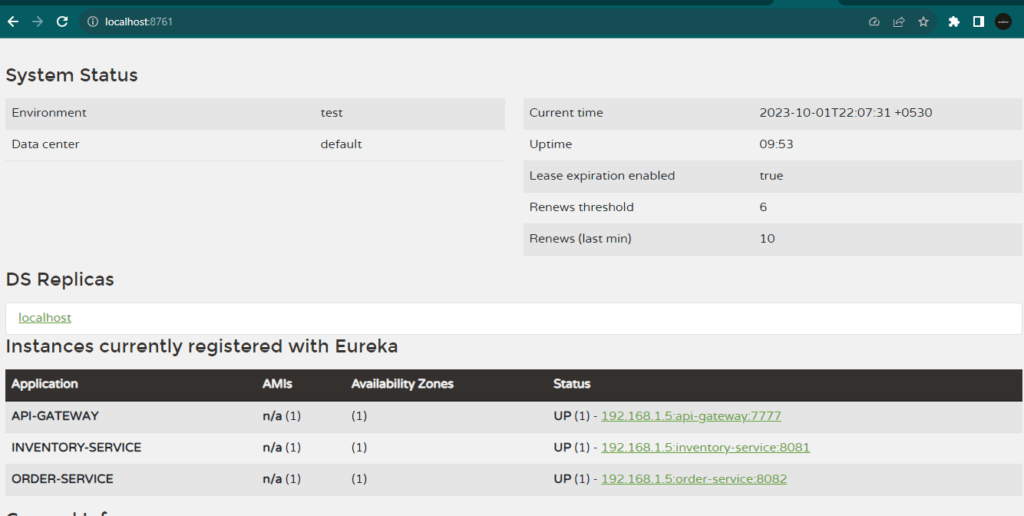
When you access the Eureka server using the URL http://localhost:8761, you will be able to view the services that are registered in Eureka. Below is a snapshot of what you will see.

4.4. Test the API Gateway and Microservices:
Once all the services are up and running, you can test the API Gateway by sending requests to it. The API Gateway should route these requests to the respective microservices (e.g., Inventory Service and Order Service) based on the defined routes.
Get All Products:
When you hit the endpoint http://localhost:7777/products using a GET request, you will receive a JSON response containing a list of products:
[
    {
        "id": 1,
        "name": "Iphone 15",
        "price": 150000.55
    },
    {
        "id": 2,
        "name": "Samsung Ultra",
        "price": 16000.56
    },
    {
        "id": 3,
        "name": "Oneplus",
        "price": 6000.99
    },
    {
        "id": 4,
        "name": "Oppo Reno",
        "price": 200000.99
    },
    {
        "id": 5,
        "name": "Oneplus 10R",
        "price": 55000.99
    }
]
Get a Product by ID:
When you hit an endpoint like http://localhost:7777/products/{id} (replace {id} with a product number) using a GET request, you will receive a JSON response containing details of the specific product:
{
    "id": 2,
    "name": "Samsung Ultra",
    "price": 16000.56
}
Create a Product Order:
You can create a product order by sending a POST request to http://localhost:7777/orders/create. Include the necessary data in the request body. For example:
{
    "productId": 1234,
    "userId": "B101",
    "quantity": 2,
    "price": 1000.6
}
You will receive a JSON response with the order details.
{
    "id": 1,
    "productId": 1234,
    "userId": "B101",
    "quantity": 2,
    "price": 1000.6
}
Fetch Orders:
To fetch orders, send a GET request to http://localhost:8082/orders. You will receive a JSON response with order details similar to the one created earlier.
{
    "id": 1,
    "productId": 1234,
    "userId": "B101",
    "quantity": 2,
    "price": 1000.6
}
By following these steps and using the provided endpoints, you can interact with the services and API Gateway, allowing you to understand how they function in your microservices architecture.
For more detailed information about the Spring Boot API Gateway, please refer to this repository: Spring Boot API Gateway Repository.
FAQs
Q1. What is an API Gateway? An API Gateway serves as a centralized entry point for efficiently managing and directing requests to microservices within a distributed architecture.
Q2. How does load balancing work in an API Gateway? Load balancing within an API Gateway involves the even distribution of incoming requests among multiple microservices instances, ensuring optimal performance and reliability.
Q3. Can I implement custom authentication methods in my API Gateway? Absolutely, you have the flexibility to implement custom authentication methods within your API Gateway to address specific security requirements.
Q4. What is the role of error handling in an API Gateway? Error handling within an API Gateway plays a crucial role in ensuring that error responses are clear and informative. This simplifies the process of diagnosing and resolving issues as they arise.
Q5. How can I monitor the performance of my API Gateway in a production environment? To monitor the performance of your API Gateway in a production setting, you can leverage monitoring tools and metrics designed to provide insights into its operational efficiency.
Feel free to reach out if you encounter any issues or have any questions along the way. Happy coding!

Hi, this is Appreciated nice useful content please try to upload more on springbooot and microServices