During the boot-up of the service, the Spring Cloud Config Client connects to the config server and fetches the service-specific configuration over the network. This configuration is then injected into the Environment object of the IOC (Inversion of Control) container, which is used to start the application.
Table of Contents
Create the Spring Boot Project
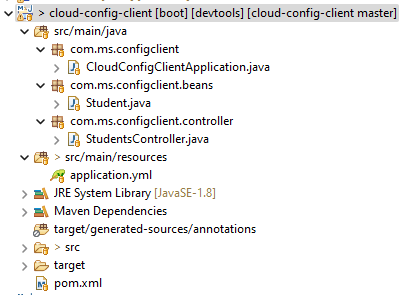
Let’s kick off by creating a Spring Boot Maven project named “spring-cloud-config-client.” To achieve this, there are two paths you can take: either visit the Spring Initializer website Spring Initializer or leverage your trusted Integrated Development Environment (IDE). The resulting project structure is as follows.

Spring Cloud Config Client Example
To understand the implementation of Spring Cloud Config Client, let’s walk through a hands-on example.
Begin by creating a Spring Boot project and adding the following dependencies to your pom.xml:
<dependency>
  <groupId>org.springframework.cloud</groupId>
  <artifactId>spring-cloud-starter-config</artifactId>
</dependency>
<dependency>
  <groupId>org.springframework.cloud</groupId>
  <artifactId>spring-cloud-starter-bootstrap</artifactId>
</dependency>
Implementing Spring Cloud Config Client in Microservices: A Step-by-Step Guide
In your main application class, the heart of your Spring Boot application, bring in essential packages and annotations. Introduce the @RefreshScope annotation, a key enabler for configuration refreshing. Here’s a snippet to illustrate:
@SpringBootApplication
@RefreshScope
public class CloudConfigClientApplication implements ApplicationRunner{

	@Autowired
	private StudentsController studentsController;

	@Value("${author}")
	private String author;

	public static void main(String[] args) {
		SpringApplication.run(CloudConfigClientApplication.class, args);
	}

	@Override
	public void run(ApplicationArguments args) throws Exception {
		System.out.println(studentsController.getStudentDetails().getBody());
		System.out.println("Author ** "+author);
	}

}
Include the following configurations in your application.properties or application.yml file to set up Spring Cloud Config
management:
  endpoint:
    refresh:
      enabled: true
  endpoints:
    web:
      exposure:
        include:
        - refresh

spring:
  application:
    name: cloud-config-client
  config:
    import: configserver:http://localhost:8888/api/v1
  profiles:
    active: dev
  main:
    allow-circular-references: true
In your main class, import necessary packages and annotations. Add the @RefreshScope annotation to enable configuration refresh. Here’s an example:
@SpringBootApplication
@RefreshScope
public class CloudConfigClientApplication implements ApplicationRunner{

	@Autowired
	private StudentsController studentsController;

	public static void main(String[] args) {
		SpringApplication.run(CloudConfigClientApplication.class, args);
	}

	//printing student details from config server.
	@Override
	public void run(ApplicationArguments args) throws Exception {
		System.out.println(studentsController.getStudentDetails().getBody());
	}

}
Here’s an example of a simple Student bean class
public class Student {

	private String studentName;
	private String studentRollNo;
	private String studentEmail;
	private String phone;
	//Generate getters and setters
}
Create a student REST controller
@RestController
@RequestMapping("/api/v1")
public class StudentsController {

	@Autowired
	private Environment env;

	@GetMapping("/students")
	public ResponseEntity<Student> getStudentDetails(){
		Student student = new Student();
		student.setStudentName(env.getProperty("student.name"));
		student.setStudentRollNo(env.getProperty("student.rollNo"));
		student.setStudentEmail(env.getProperty("student.email"));
		student.setPhone(env.getProperty("student.phone"));
		return new ResponseEntity<Student>(student, HttpStatus.OK);
	}
}- Start the Spring Cloud Config Server: Before setting up the Spring Cloud Config Client, ensure the Spring Cloud Config Server is up and running.
- Start the Spring Cloud Config Client: Next, initiate the Spring Cloud Config Client by starting your application with the desired profile and Spring Cloud Config settings using the command below:
java -Dspring.profiles.active=dev -jar target/your-application.jarReplace:
devwith the desired profile (dev,sit,uat, etc.).http://config-server-url:8888with the actual URL of your Spring Cloud Config Server.your-application.jarwith the name of your application’s JAR file.
After starting the application with the specified Spring Cloud Config settings, you can access the following local URL: http://localhost:8081/api/v1/students. The output looks like below when you hit this endpoint:
{
    "studentName": "Sachin",
    "studentRollNo": "1234",
    "studentEmail": "sachin1@gmail.com",
    "phone": "123456781"
}
For more information on setting up and using Spring Cloud Config Server, you can refer Spring Config Server blog post at https://javadzone.com/spring-cloud-config-server/.
In a nutshell, Spring Cloud Config Client enables seamless integration of dynamic configurations into your Spring Boot application, contributing to a more adaptive and easily maintainable system. Dive into the provided example and experience firsthand the benefits of efficient configuration management. If you’d like to explore the source code, it’s available on my GitHub Repository: GitHub Repository Link. Happy configuring!

Nice explanation. Thanks!