
Are you ready to take your application to the next level? In the world of software development, it’s not enough to create an application; you also need to ensure it runs smoothly in a production environment. This is where “Spring Boot Actuator” comes into play. In this comprehensive guide, we’ll walk you through the process of enhancing your application’s monitoring and management capabilities using Spring Boot Actuator.
Table of Contents
Step 1: Understanding the Need
Why Additional Features Are Essential
After thoroughly testing your application, you’ll likely find that deploying it in a production environment requires more than just functional code. You need features that enable monitoring and management. Traditionally, this might involve maintaining a dedicated support team to ensure your application is always up and running.
Step 2: What is Spring Boot Actuator?
Spring Boot Actuator is a powerful feature bundled with Spring Boot. It provides a set of predefined endpoints that simplify the process of preparing your application for production deployment. These endpoints allow you to monitor and manage various aspects of your application seamlessly.
Step 3: Spring Boot Actuator Endpoints
Spring Boot Actuator offers a variety of endpoints to cater to different monitoring and management needs:
- info: Provides arbitrary information about your application, such as author, version, and licensing.
- health: Checks the liveness probe of your application to ensure it’s running and accessible.
- env: Displays all environment variables used by your application.
configprops: Lists all configuration properties utilized by your application.- beans: Shows all the bean definitions within the IoC container.
- thread dump: Provides access to the current JVM thread dump.
- metrics: Offers runtime information about your application, including memory usage, CPU utilization, and heap status.
- loggers: Displays loggers and their logging levels.
- logfile: Shows the application’s log file.
- shutdown: Allows for remote application shutdown.
- sessions: Presents active HTTP sessions of the web application.
- conditions: Shows the conditions that influence auto-configurations.
Step 4: Enabling Actuator Endpoints
Before we can start configuring and using Actuators, we need to add the Actuator dependency to our project pom.xml.
Spring Boot Starter Actuator Dependency
Maven:
<dependency>
		<groupId>org.springframework.boot</groupId>
		<artifactId>spring-boot-starter-actuator</artifactId>
</dependency>
Gradle:
implementation 'org.springframework.boot:spring-boot-starter-actuator'To make use of these valuable endpoints, you’ll need to enable them by adding the “spring-boot-starter-actuator” dependency to your Spring Boot project. This will grant you access to the endpoints via URLs like “http://localhost:8080/actuator/{endpointId}“.
These endpoints are exposed by Spring Boot in two ways:
- JMX: JMX, or Java Management Extensions, is a specification provided by Java as part of J2SE5. It standardizes the API for managing devices, servers, and more. With JMX, you can programmatically manage devices or servers at runtime through JMX extensions. For example, instead of manually configuring a datasource in a WebLogic server through its console, you can automate the datasource configuration on an application server using JMX endpoints exposed by the application server.
- HTTP/Web: These are REST endpoints exposed over the HTTP protocol, making them accessible from a web browser or any HTTP client.
However, it’s worth noting that it’s recommended to expose Actuator endpoints through JMX rather than HTTP/Web endpoints due to security reasons. All Actuator endpoints are available for access via both JMX and HTTP/Web by default, and you don’t need to write any special code to enable or support them. You simply need to configure which endpoints you want to expose over which protocol, and Spring Boot Actuator will take care of exposing them accordingly.
To make an endpoint accessible in Spring Boot Actuator, you need to do two things:
- Enable the Endpoint
- Expose the Endpoint through JMX, HTTP, or Both
By default, all the endpoints of Spring Boot Actuator are enabled, except for the “shutdown” endpoint. If you want to disable these endpoints by default, you can add a property in your application.properties file:
management.endpoints.enabled-by-default=falseNow, you can enable each individual endpoint in a controlled way using the endpoint’s ID, as shown below:
# Enable specific Actuator endpoints
management.endpoint.info.enabled=true
management.endpoint.shutdown.enabled=true
management.endpoint.endpointId.enabled=true
In your application.properties file,
# Expose all endpoints
management.endpoints.web.exposure.include=*
This configuration tells Spring Boot Actuator to include all endpoints for web/HTTP access.
Excluding Specific Actuator Endpoints
# Exclude specific endpoints by their ID
management.endpoints.web.exposure.exclude=shutdown, sessions, conditions
Using application.yaml:
In your application.yaml file, you can include the following configuration to expose all the endpoints:
management:
  endpoints:
    web:
      exposure:
        include: "*"
Next, you’ll need to specify how you want to expose these endpoints, either through JMX or HTTP. By default, only two endpoints, “info” and “health,” are exposed for security reasons. If you want more Actuator endpoints to be accessible, you can configure this using the following properties in either application.properties or application.yaml
In application.properties
# Expose Actuator endpoints for both JMX and HTTP/Web access
management.endpoints.jmx.exposure.include=info, health, env, configProps
management.endpoints.web.exposure.include=info, health, env, configProps
In application.yaml:
management:
  endpoints:
    web: #Web endpoints configuration
      exposure:
        include: info, health, env, configProps
    jmx: #JMX endpoints configuration
      exposure:
include: info, health, env, configPropsBy testing your application first, you can ensure that everything is set up correctly before customizing Actuator endpoint exposure in the next section.
Step 5: Fine-Tuning Endpoint Exposure
If the predefined endpoints don’t cover your specific needs, you can extend them or create your own. Here’s an example of how to customize the “health” and “info” endpoints:
@Component
class AppHealthEndpoint implements HealthIndicator {
  public Health health() {
    // Perform checks on external or application-dependent resources and return UP or DOWN.
    return Health.Up().build();
  }
}

@Component
class AppInfoEndpoint implements InfoContributor {
  public void contribute(Builder builder) {
    builder.withDetails("key", "value").build();
  }
}
Step 6: Building Custom Endpoints
Actuator endpoints are essentially REST APIs, and you can build your custom endpoints using Spring Boot Actuator API. This is preferable over standard Spring REST controllers because it allows for JMX access and management.
Here’s a simplified example of how to create a custom endpoint:
@Component
@Endpoint(id = "cachereload")
class CacheReloadEndpoint {
  @UpdateOperation
  public int reloadCache(String resource) {
    // Implement your custom logic here.
  }
}
To trigger a cache reload using this custom endpoint, you can send an HTTP PUT request like this:
http://localhost:8081/actuator/cachereload?resource=cities.propertiesTesting Specific Actuator Endpoints
- Run Your Application: Ensure that your Spring Boot application is running.
- Access the Info Endpoint: Open a web browser or use a tool like
curlto make an HTTP GET request to the following URL:
- Info Endpoint (
/actuator/info)
http://localhost:8080/actuator/info{
"app": {
"name": "boot-actuator",
"version": "1.0.0"
},
"author": "Pavan"
}
2. Health Endpoint (/actuator/health)
http://localhost:8080/actuator/health

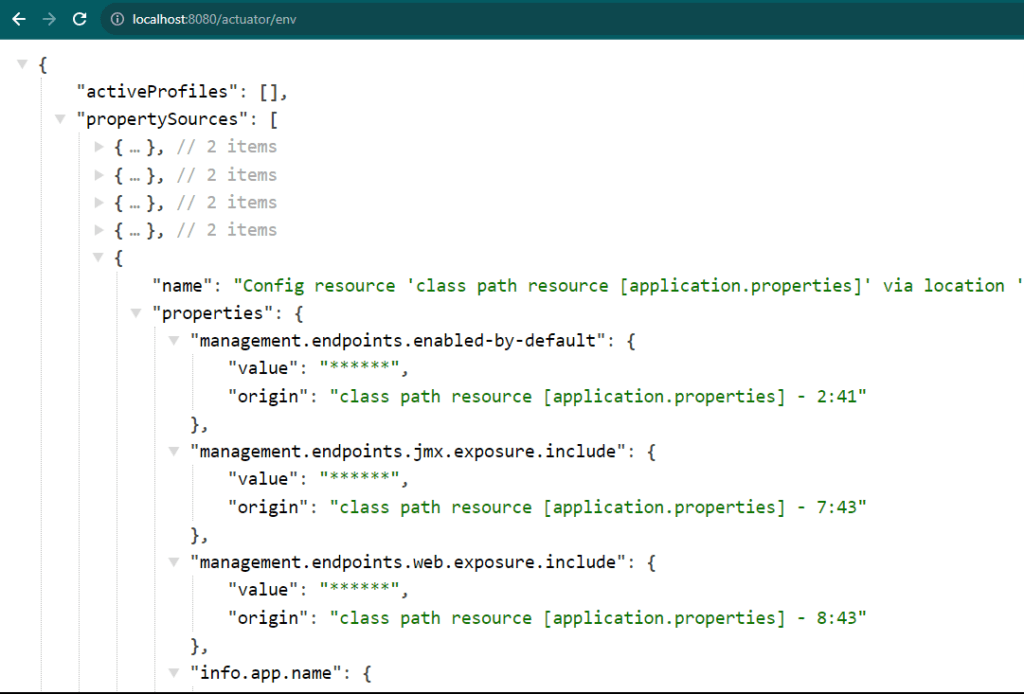
3. Environment (Env) Endpoint (/actuator/env)
http://localhost:8080/actuator/env
4. Configuration Properties (ConfigProps) Endpoint (/actuator/configprops)
http://localhost:8080/actuator/configprops
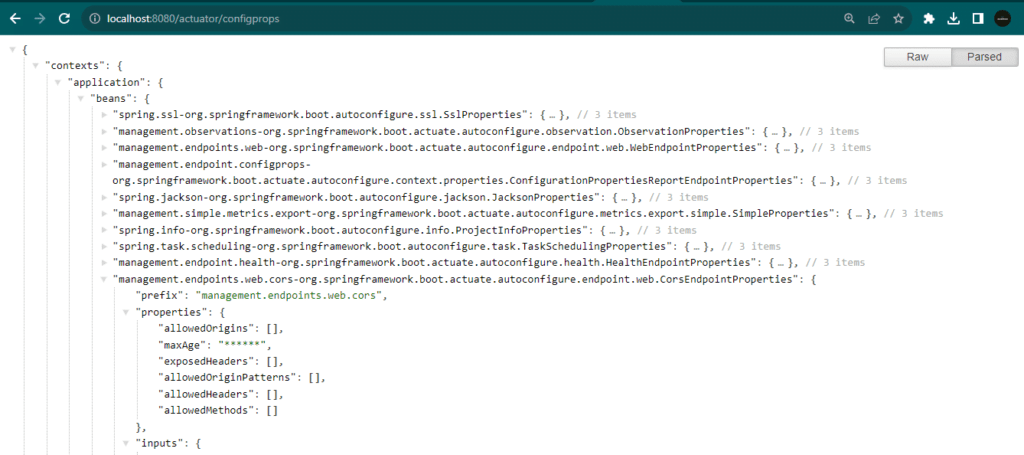
These are the expected JSON responses when you make HTTP GET requests to the specified Actuator endpoints.
- access the GitHub repository associated with this project at https://github.com/askPavan/boot-actuator to explore the project’s code repository.
- For more information about Actuator endpoints, you can refer to the official Spring Boot Actuator documentation.
Conclusion:
In this guide, you’ve learned the essentials of Spring Boot Actuator, enabling you to monitor, manage, and customize your Spring Boot applications effectively. You’ve discovered how to test Actuator endpoints, fine-tune their exposure, and explore the associated GitHub repository for practical insights. Armed with this knowledge, you’re better equipped to maintain robust applications in production environments.