Introduction:
When we need to reuse the logic of one application in another application, we often turn to web services or RESTful services. However, if we want to asynchronously share data from one application to another, message queues, and in particular, Spring Boot Apache Kafka, come to the rescue.

Message queues operate on a publish-subscribe (pub-sub) model, where one application acts as a publisher (sending data to the message queue), and another acts as a subscriber (receiving data from the message queue). Several message queue options are available, including JMS, IBM MQ, RabbitMQ, and Apache Kafka.
Apache Kafka is an open-source distributed streaming platform designed to handle such scenarios.
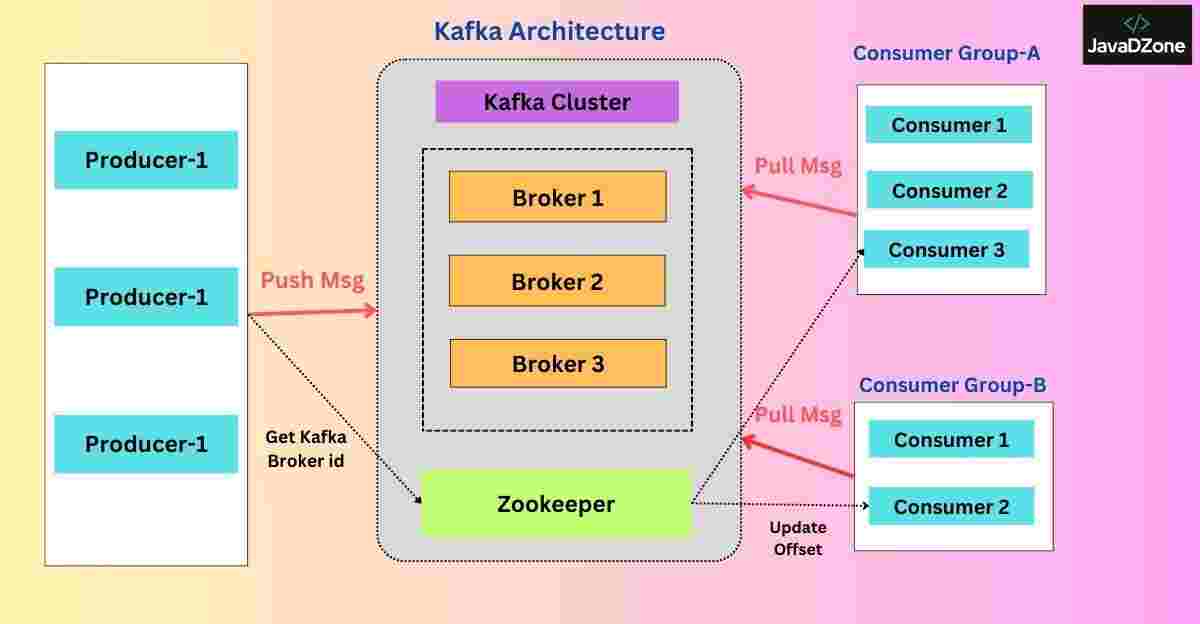
Kafka Cluster As Kafka is a distributed system, it functions as a cluster consisting of multiple brokers. A Kafka cluster should have a minimum of three brokers. The diagram below illustrates a Kafka cluster with three brokers:
Table of Contents
Apache Kafka Architecture

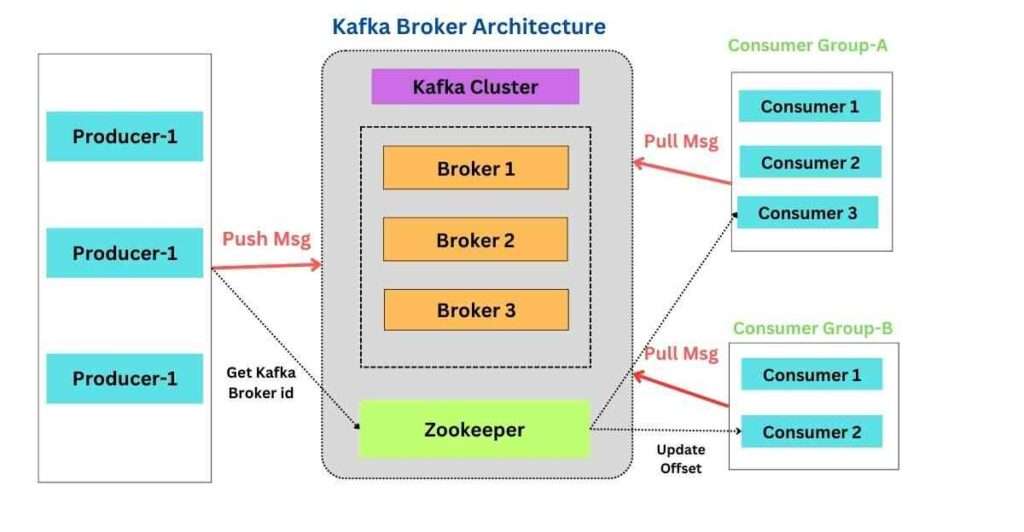
Kafka Broker A Kafka broker is essentially a Kafka server. It serves as an intermediary, facilitating communication between producers (data senders) and consumers (data receivers). The following diagram depicts a Kafka broker in action:
Kafka Broker Architecture

Main APIs in Spring Boot Apache Kafka
- Producer API: Responsible for publishing data to the message queue.
- Consumer API: Deals with consuming messages from the Kafka queue.
- Streams API: Manages continuous streams of data.
- Connect API: Handles connections with Kafka (used by both producers and subscribers).
- Admin API: Manages Kafka topics, brokers, and related configurations.
Steps:
Step 1: Download and Extract Kafka
Begin by downloading Kafka from this link and extracting it to your desired location.
It’s recommended to download the binary file rather than the source file.

Step 2: Start the ZooKeeper Server
The ZooKeeper server provides the environment for running the Kafka server. Depending on your operating system:
For Windows, open a command prompt, navigate to the Kafka folder, and run:
bin\windows\zookeeper-server-start.bat config\zookeeper.propertiesFor Linux/Mac, use the following command:
bin/zookeeper-server-start.sh config/zookeeper.propertiesZooKeeper runs on port 2181.
Step 3: Start the Kafka Server
After starting ZooKeeper, run the Kafka server with the following command for Windows:
bin\windows\kafka-server-start.bat config\server.propertiesFor Linux/Mac, use the following command:
bin/kafka-server-start.sh config/server.propertiesKafka runs on port 9092.
Step 4: Create a Kafka Topic
You can create a Kafka topic using two methods:
4.1. Using Command Line:
Open a command prompt or terminal and run the following command for Windows:
bin\windows\kafka-topics.bat --create --topic student-enrollments --bootstrap-server localhost:9092Replace “student-enrollments” with your desired topic name.
For Linux/Mac:
bin/kafka-topics.sh --create --topic student-enrollments --bootstrap-server localhost:90924.2. From the Spring Boot Application (Kafka Producer):
For this, we’ll create a Kafka producer application that will programmatically create a topic.
Step 5: Setting Up a Spring Boot Kafka Producer
Step 5.1: Add Dependencies
In your Spring Boot project, add the following dependencies to your pom.xml or equivalent configuration:
<dependency>
    <groupId>org.springframework.boot</groupId>
    <artifactId>spring-boot-starter-web</artifactId>
</dependency>
<dependency>
    <groupId>org.springframework.kafka</groupId>
    <artifactId>spring-kafka</artifactId>
</dependency>
<dependency>
    <groupId>org.springframework.boot</groupId>
    <artifactId>spring-boot-starter-aop</artifactId>
</dependency>
<dependency>
    <groupId>org.springframework.retry</groupId>
    <artifactId>spring-retry</artifactId>
</dependency>
Step 5.2: Configure Kafka Producer Properties
Add the following Kafka producer properties to your application.properties or application.yml:
# Producer Configurations
spring.kafka.producer.bootstrap-servers=localhost:9092
spring.kafka.producer.key-serializer=org.apache.kafka.common.serialization.StringSerializer
spring.kafka.producer.value-serializer=org.apache.kafka.common.serialization.StringSerializer
Step 5.3: Enable Retry
Add the @EnableRetry annotation to your application class to enable event retrying:
@EnableRetry
@SpringBootApplication
public class KafkaProducerApplication {
    public static void main(String[] args) {
        SpringApplication.run(KafkaProducerApplication.class, args);
    }
}
Step 5.4: Create Kafka Topics
Configure Kafka topics in a KafkaConfig.java class:
@Configuration
public class KafkaConfig {
    public static final String FIRST_TOPIC = "student-enrollments";
    public static final String SECOND_TOPIC = "student-grades";
    public static final String THIRD_TOPIC = "student-achievements";

    @Bean
    List<NewTopic> topics() {
        List<String> topicNames = Arrays.asList(FIRST_TOPIC, SECOND_TOPIC, THIRD_TOPIC);
        return topicNames.stream()
            .map(topicName -> TopicBuilder.name(topicName).build())
            .collect(Collectors.toList());
    }
}
Step 5.5: Create a Producer Service:
Implement a ProducerService.java to send messages:
@Service
public class ProducerService {

    @Autowired
    private KafkaTemplate<String, String> kafkaTemplate;

    @Retryable(maxAttempts = 3)
    public CompletableFuture<SendResult<String, String>> sendMessage(String topicName, String message) {
        return this.kafkaTemplate.send(topicName, message);
    }
}
Step 5.6: Create a Student Bean Define a Student class with appropriate getters, setters, and a constructor.
public class Student {
	private String name;
	private String email;

	//accessors
}
Step 5.7: Create a Kafka Controller Create a controller to produce messages:
@RestController
public class KafkaController {
    @Autowired
    private ProducerService producerService;

    @PostMapping("/produce")
    public ResponseEntity<String> produce(@RequestParam String topicName, @RequestBody Student student)
            throws InterruptedException, ExecutionException {
        String successMessage = null;
        producerService.sendMessage(topicName, "Producing Student Details: " + student);
        successMessage = String.format(
                "Successfully produced student information to the '%s' topic. Please check the consumer.", topicName);
        return ResponseEntity.status(HttpStatus.OK).body(successMessage);
    }
}
Step 6: Spring Boot Consumer Application
You can consume Kafka events/topics in two ways:
Step 6.1: Using Command Line
To consume messages using the command line for Windows, use the following command:
bin\windows\kafka-console-consumer.bat --topic student-enrollments --from-beginning --bootstrap-server localhost:9092Step 6.2: Building a Consumer Application
To build a consumer application, follow these steps:
Step 6.2.1: Create a Spring Boot Project Create a Spring Boot project with an application class.
@SpringBootApplication
public class KafkaConsumerApplication {
    public static void main(String[] args) {
        SpringApplication.run(KafkaConsumerApplication.class, args);
    }
}
Step 6.2.2: Create a Kafka Consumer
Implement a Kafka consumer class to consume messages:
@Service
public class KafkaConsumer {
    @KafkaListener(topics = {"student-enrollments", "student-grades", "student-achievements"}, groupId = "group-1")
    public void consume(String value) {
        System.out.println("Consumed: " + value);
    }
}
Step 6.2.3: Configure Kafka Consumer Properties
Configure Kafka consumer properties in application.properties or application.yml:
server.port=8089
spring.kafka.consumer.bootstrap-servers=localhost:9092
spring.kafka.consumer.group-id=group-1
spring.kafka.consumer.auto-offset-reset=earliest
spring.kafka.consumer.key-deserializer=org.apache.kafka.common.serialization.StringDeserializer
spring.kafka.consumer.value-deserializer=org.apache.kafka.common.serialization.StringDeserializer
Step 6.2.4: Run Your Kafka Consumer Application
Make sure to follow each step carefully, and don’t miss any instructions. This guide should help beginners set up and use Apache Kafka with Spring Boot effectively
Now that you’ve set up your Kafka producer and Kafka consumer applications, it’s time to run them.
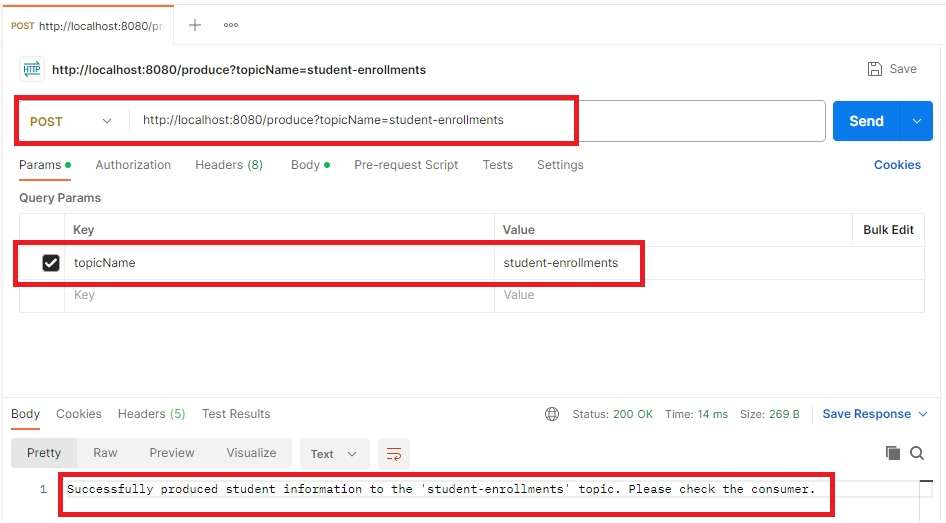
Execute both the Producer and Consumer applications. In the Producer application, make a request to the following endpoint: http://localhost:8080/produce?topicName=student-enrollments. You will observe the corresponding output in the Consumer application and in the console when you are subscribed to the same “student-enrollments” topic.

To monitor the topic from the console, use the following command:
bin\windows\kafka-console-consumer.bat --topic student-enrollments --from-beginning --bootstrap-server localhost:9092
You can follow the same process to produce messages for the remaining topics, “student-enrollments” and “student-achievements,” and then check the corresponding output.
Conclusion
To recap, when you need to asynchronously share data between applications, consider using Apache Kafka, a message queue system. Kafka functions in a cluster of brokers, and this guide is aimed at helping beginners set up Kafka with Spring Boot. After setup, run both producer and consumer applications to facilitate data exchange through Kafka.
For more detailed information on the Kafka producer application, you can clone the repository from this link: Kafka Producer Application Repository.
Similarly, for insights into the Kafka consumer application, you can clone the repository from this link: Kafka Consumer Application Repository.
These repositories provide additional resources and code examples to help you better understand and implement Kafka integration with Spring Boot.

Awesome man, easy and simple to follow and implement; keep it up,