Global State in React with Context API

Managing state in a React application can quickly become complex, especially as your app grows. To tackle this issue, React provides the Context API, a powerful feature that allows you to share state across components without the need to pass props down manually at every level. In this blog post, “Global State in React with Context API,” we will explore how to implement global state management using the Context API, along with practical examples and best practices.

What is the Context API?

The Context API is a built-in feature of React that allows you to create global state that can be accessed by any component in your application. This is particularly useful for managing user authentication, theme settings, or any data that needs to be accessed by many components.

Setting Up the Context API

To get started, you need to create a Context. Here’s how you can do that:

File: UserContext.js

import React, { createContext, useState } from 'react';

// Create the Context
const UserContext = createContext();

// Create a Provider Component
const UserProvider = ({ children }) => {
  const [user, setUser] = useState(null);

  return (
    <UserContext.Provider value={{ user, setUser }}>
      {children}
    </UserContext.Provider>
  );
};

export { UserContext, UserProvider };

Using the Context in Your Components

Now that you have a Context and a Provider, you can wrap your application with the UserProvider to make the user state available to all components.

File: App.js

import React from 'react';
import { UserProvider } from './UserContext';
import UserProfile from './UserProfile';

const App = () => {
  return (
    <UserProvider>
      <UserProfile />
    </UserContext>
  );
};

export default App;

Accessing the Context

You can now access the user state in any component that is a descendant of the UserProvider.

File: UserProfile.js

import React, { useContext } from 'react';
import { UserContext } from './UserContext';

const UserProfile = () => {
  const { user, setUser } = useContext(UserContext);

  const handleLogin = () => {
    setUser({ name: 'Pavan Kumar' });
  };

  return (
    <div>
      <h1>User Profile</h1>
      {user ? <p>Welcome, {user.name}</p> : <button onClick={handleLogin}>Login</button>}
    </div>
  );
};

export default UserProfile;

When you click on Login button:

Global State in React with Context API

Best Practices for Using Global State in React with Context API

  1. Limit Context Use: Use Context for data that is truly global. For more localized state, consider using component state or other state management libraries.
  2. Performance Optimization: Avoid updating context state too frequently. This can cause unnecessary re-renders of all consuming components. Instead, try to batch updates.
  3. Split Contexts: If you have multiple pieces of state that need to be shared, consider creating separate contexts for each. This keeps your code organized and prevents components from re-rendering unnecessarily.

Advanced State Management with Reducers

For more complex state management, you might want to integrate the useReducer hook with the Context API. This is especially useful when you need to manage multiple state variables or complex state logic.

Setting Up a Reducer

File: UserReducer.js

const initialState = { user: null };

const userReducer = (state, action) => {
  switch (action.type) {
    case 'LOGIN':
      return { ...state, user: action.payload };
    case 'LOGOUT':
      return { ...state, user: null };
    default:
      return state;
  }
};

export { initialState, userReducer };

Combining with Context

Now, you can use this reducer in your context.

File: UserContext.js (Updated)

import React, { createContext, useReducer } from 'react';
import { userReducer, initialState } from './UserReducer';

const UserContext = createContext();

const UserProvider = ({ children }) => {
  const [state, dispatch] = useReducer(userReducer, initialState);

  return (
    <UserContext.Provider value={{ state, dispatch }}>
      {children}
    </UserContext.Provider>
  );
};

export { UserContext, UserProvider };

Dispatching Actions

You can dispatch actions from your components to update the state.

File: UserProfile.js (Updated)

import React, { useContext } from 'react';
import { UserContext } from './UserContext';

const UserProfile = () => {
  const { state, dispatch } = useContext(UserContext);

  const handleLogin = () => {
    dispatch({ type: 'LOGIN', payload: { name: 'John Doe' } });
  };

  const handleLogout = () => {
    dispatch({ type: 'LOGOUT' });
  };

  return (
    <div>
      <h1>User Profile</h1>
      {state.user ? (
        <>
          <p>Welcome, {state.user.name}</p>
          <button onClick={handleLogout}>Logout</button>
        </>
      ) : (
        <button onClick={handleLogin}>Login</button>
      )}
    </div>
  );
};

export default UserProfile;

FAQs

Q1: When should I use Context API instead of Redux?
A: Use Context API for simpler applications where state management doesn’t get too complicated. For larger applications with complex state logic, Redux might be a better choice.

Q2: Can I combine Context API with Redux?
A: Yes, you can use both together. You might use Context API for certain parts of your application while managing more complex states with Redux.

Q3: Is Context API suitable for every component?
A: No, use it for data that needs to be accessed globally. For local component state, prefer using useState.

Q4: How do I optimize performance when using Context?
A: Minimize updates to context state and consider splitting your context into smaller, more focused contexts to reduce unnecessary re-renders.

Thank you for reading! If you found this guide helpful and want to stay updated on more React.js content, be sure to follow us for the latest tutorials and insights: JavaDZone React.js Tutorials. Happy coding!
Latest Posts:

Event Handling in React JS

Handling events in React JS is a fundamental skill for any developer, whether you’re just starting or you’ve been working with React JS for years. Mastering event handling in React JS not only makes your applications more dynamic and interactive but also lays a strong foundation for creating more complex features.

In this article, we’ll cover everything you need to know about event handling in React, including practical examples, best practices, and FAQs. This guide is designed to be beginner-friendly but also provides advanced insights for experienced developers.

1. Introduction to Event Handling in React JS

In React, event handling is similar to handling events in plain HTML and JavaScript, but with some unique differences. React uses what is called a synthetic event system, which helps maintain cross-browser compatibility. Events are a core part of React applications, enabling interactivity by responding to user actions like clicks, keypresses, form submissions, and more.

2. Understanding Event Basics in React

In HTML, you’d typically write event listeners directly within the element:

<button onclick="handleClick()">Click Me</button>

However, in React, events are handled a bit differently, using camelCase for naming and attaching functions directly:

<button onClick={handleClick}>Click Me</button>

Example: App.js

// Import React
import React from 'react';

// Define the functional component
function App() {
    const handleClick = () => {
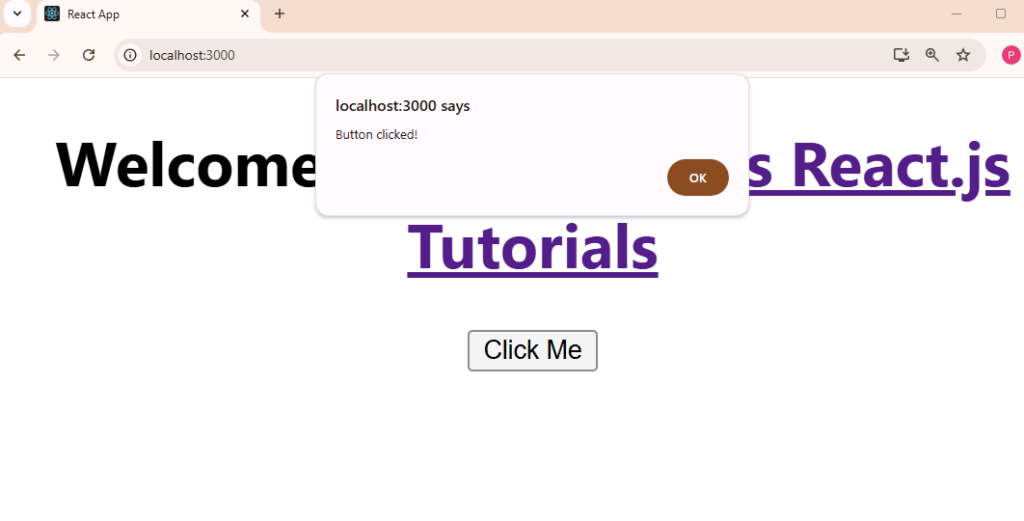
        alert("Button clicked!");
    };

    return (
        <div>
            <button onClick={handleClick}>Click Me</button>
        </div>
    );
}

export default App;
Event Handling in React JS

3. Event Binding in React

In React class components, you may encounter event binding issues due to JavaScript’s this keyword. There are several ways to bind events in React, especially when working with class components.

Binding in the Constructor

Example: App.js

class App extends React.Component {
    constructor(props) {
        super(props);
        this.state = { message: "Hello!" };
        this.handleClick = this.handleClick.bind(this);
    }

    handleClick() {
        this.setState({ message: "Button clicked!" });
    }

    render() {
        return (
            <div>
                <button onClick={this.handleClick}>Click Me</button>
                <p>{this.state.message}</p>
            </div>
        );
    }
}

Using Arrow Functions

Arrow functions automatically bind the this context.

handleClick = () => {
    this.setState({ message: "Button clicked!" });
}

4. Passing Arguments to Event Handlers

Sometimes, you may need to pass parameters to event handlers. You can do this by wrapping the handler in an inline arrow function.

Example: App.js

function App() {
    const handleClick = (message) => {
        alert(message);
    };

    return (
        <div>
            <button onClick={() => handleClick("Button clicked!")}>Click Me</button>
        </div>
    );
}

5. Synthetic Events in React

React provides a cross-browser wrapper called SyntheticEvent for native events. This wrapper offers consistent behavior across different browsers. Synthetic events work the same as native events but come with additional benefits, such as performance optimizations by React.

6. Practical Examples of Common Events

Here are some frequently used events in React and how to implement them:

1. onChange Event

Commonly used with input elements to handle form data.

function App() {
    const handleChange = (event) => {
        console.log("Input value:", event.target.value);
    };

    return (
        <input type="text" onChange={handleChange} placeholder="Type here..." />
    );
}

2. onSubmit Event

Typically used with forms.

function App() {
    const handleSubmit = (event) => {
        event.preventDefault();
        alert("Form submitted!");
    };

    return (
        <form onSubmit={handleSubmit}>
            <button type="submit">Submit</button>
        </form>
    );
}

3. onMouseEnter and onMouseLeave Events

Used to detect when a user hovers over an element.

function App() {
    const handleMouseEnter = () => console.log("Mouse entered");
    const handleMouseLeave = () => console.log("Mouse left");

    return (
        <div
            onMouseEnter={handleMouseEnter}
            onMouseLeave={handleMouseLeave}
            style={{ padding: "20px", border: "1px solid #ddd" }}
        >
            Hover over me
        </div>
    );
}

7. Best Practices for Event Handling

  1. Use Arrow Functions Carefully: Avoid using arrow functions directly in JSX to prevent unnecessary re-renders.
  2. Optimize for Performance: For performance-sensitive code, use React.memo to prevent re-renders and event handling issues.
  3. Event Delegation: In lists or dynamic content, consider using event delegation to manage events more efficiently.
  4. Avoid Inline Functions: Avoid inline functions when possible, as they can lead to unnecessary re-renders and reduced performance.

8. FAQs

Q1: What are synthetic events in React?
A: Synthetic events in React are wrappers around native events, providing consistent behavior across browsers. They ensure better performance and cross-browser compatibility.

Q2: How do I prevent the default behavior of an event in React?
A: Use event.preventDefault() in the event handler function to prevent the default behavior. For example:

function handleSubmit(event) {
    event.preventDefault();
    // custom code here
}

Q3: How do I pass arguments to an event handler in React?
A: Wrap the handler in an arrow function and pass the arguments as needed:

<button onClick={() => handleClick("argument")}>Click Me</button>

Thank you for reading! If you found this guide helpful and want to stay updated on more React.js content, be sure to follow us for the latest tutorials and insights: JavaDZone React.js Tutorials. Happy coding!

React State and Context API Explained

React State and Context API Explained: Managing State Efficiently – Managing state effectively in a React application ensures better user experience and efficient performance. This post will guide you through React’s state management, from basic component state with useState to global state with Context API. By the end, you’ll have practical insights into state management and best practices.

React State and Context API :

What is State in React?

State in React represents data that may change over time. Each component can maintain its own state using the useState hook, allowing React to re-render the component when the state changes.

File: Counter.js

import React, { useState } from 'react';

function Counter() {
  const [count, setCount] = useState(0);

  return (
    <div>
      <p>Current Count: {count}</p>
      <button onClick={() => setCount(count + 1)}>Increment</button>
    </div>
  );
}

export default Counter;

In this example, the Counter component has its own state, count, that updates every time the button is clicked.

React State and Context API

Lifting State Up: Sharing State Across Components

When multiple components need access to the same data, lifting state up to a common parent component is useful. This way, the state is managed in one place and passed down as props.

Files: ParentComponent.js, ChildComponent1.js, ChildComponent2.js

// ParentComponent.js
import React, { useState } from 'react';
import ChildComponent1 from './ChildComponent1';
import ChildComponent2 from './ChildComponent2';

function ParentComponent() {
  const [sharedState, setSharedState] = useState(0);

  return (
    <div>
      <ChildComponent1 sharedState={sharedState} />
      <ChildComponent2 setSharedState={setSharedState} />
    </div>
  );
}

export default ParentComponent;

// ChildComponent1.js
import React from 'react';

function ChildComponent1({ sharedState }) {
  return <p>Shared State: {sharedState}</p>;
}

export default ChildComponent1;

// ChildComponent2.js
import React from 'react';

function ChildComponent2({ setSharedState }) {
  return <button onClick={() => setSharedState(prev => prev + 1)}>Increment</button>;
}

export default ChildComponent2;

In this setup, ParentComponent holds the state, which is passed to both ChildComponent1 and ChildComponent2, allowing both components to access or update the same state.


Context API : Managing Global State

For larger applications where multiple components require the same state, React’s Context API provides an effective solution by creating a global state. This eliminates the need for prop drilling.

Setting Up a Theme Context with Context API

  1. Create a Context for Theme File: ThemeContext.js
   import React, { createContext, useState, useContext } from 'react';

   // Create a Context
   const ThemeContext = createContext();

   // Theme Provider Component
   export function ThemeProvider({ children }) {
     const [isDark, setIsDark] = useState(false);

     return (
       <ThemeContext.Provider value={{ isDark, setIsDark }}>
         {children}
       </ThemeContext.Provider>
     );
   }

   // Custom hook for convenience
   export function useTheme() {
     return useContext(ThemeContext);
   }

Here, we create a ThemeContext and export ThemeProvider to manage theme state. The custom useTheme hook simplifies accessing theme data in components.

  1. Provide the Theme Context to the Application File: Root.js
   // Root.js
   import React from 'react';
   import { ThemeProvider } from './ThemeContext';
   import App from './App';

   function Root() {
     return (
       <ThemeProvider>
         <App />
       </ThemeProvider>
     );
   }

   export default Root;

In this file, ThemeProvider wraps the App, making the theme data accessible throughout the component tree.

  1. Consume the Theme Context in a Component File: ThemeSwitcher.js
   // ThemeSwitcher.js
   import React from 'react';
   import { useTheme } from './ThemeContext';

   function ThemeSwitcher() {
     const { isDark, setIsDark } = useTheme();

     return (
       <div>
         <p>Current Theme: {isDark ? 'Dark' : 'Light'}</p>
         <button onClick={() => setIsDark(prev => !prev)}>Toggle Theme</button>
       </div>
     );
   }

   export default ThemeSwitcher;

The ThemeSwitcher component uses the useTheme hook to access and toggle the theme state.


Best Practices for Using State and Context API

  1. Limit Context Usage for Performance: Overusing Context for frequently-changing data may cause excessive re-renders. Limit Context usage for data that doesn’t change often (e.g., theme, user settings).
  2. Use Custom Hooks for Reusability: Wrapping Context logic in a custom hook (like useTheme) makes your code cleaner and easier to maintain.
  3. Avoid Context for Local State: Use Context only for global or shared state. Local state that concerns a single component should remain in that component.
  4. Combine Context with Reducer for Complex State: If you need to manage more complex state, consider combining Context API with useReducer. This pattern is useful in applications with actions that require different state transitions.

FAQs

1. When should I use Context API over Redux?
Context API is great for small to medium applications where global state isn’t very complex. For larger apps with complex state, Redux or another state management library is more efficient.

2. Can I use multiple Contexts?
Yes, you can create multiple Contexts and use them together. However, avoid excessive nesting, as it can make your component structure harder to manage.

3. Is Context API suitable for frequently-updated data?
For frequently-changing data, Context API may cause performance issues due to re-renders. For such cases, Redux or custom hooks are often better.

4. How do I avoid prop drilling without using Context API?
While Context API is the primary solution for avoiding prop drilling, organizing components effectively and using custom hooks can also help reduce the need for deep prop passing.

5. Can I use the Context API with class components?
Yes, the Context API can be used with class components through the contextType property or the Consumer component, though it’s more commonly used with functional components.


Conclusion

React’s useState and Context API are essential tools for managing state efficiently in React applications. Understanding how and when to use each is key to building scalable, maintainable apps. Following best practices, such as using custom hooks and avoiding overuse of Context, will ensure your app’s performance and readability. By incorporating these state management strategies, you’ll be well-prepared to handle any React project, from simple to complex.

Thank you for reading! If you found this guide helpful and want to stay updated on more React.js content, be sure to follow us for the latest tutorials and insights: JavaDZone React.js Tutorials. Happy coding!
What is React JS

What is React? A Beginner’s Guide to React.js Framework

React.js, commonly referred to as React, is an open-source JavaScript library created by Facebook in 2013. What is React JS? A Beginner’s Guide to React.js Framework Designed for building interactive, dynamic user interfaces (UI), React has since become one of the most popular choices for web development. React enables developers to build scalable, fast, and efficient applications by breaking down complex UIs into reusable components, which can dramatically simplify both the development and maintenance of applications.

Why Choose React?

React is favored by many developers due to its flexibility, speed, and efficiency. Here are a few reasons why React is widely adopted:

  1. Reusable Components: React allows developers to create independent, reusable components that can be used throughout the application. This leads to faster development and consistent user experiences.
  2. Virtual DOM: Unlike traditional DOM manipulation, React uses a virtual DOM that improves performance by minimizing real DOM changes. This optimizes rendering and enhances the speed of the application.
  3. Declarative Syntax: React’s declarative syntax makes code more readable and easier to debug. Developers can describe what the UI should look like, and React efficiently manages the underlying updates.
  4. Large Community and Ecosystem: React has a vibrant community, a vast library of third-party tools, and extensive documentation, making it beginner-friendly while also catering to complex projects.

Setting Up a React Environment

To get started with React, you need Node.js and npm (Node Package Manager) installed on your machine.

  1. Install Node.js:
    • Download and install Node.js from the official website. This will automatically install npm as well.
  2. Create a New React Application:
    • Open your terminal and run the following command:
npx create-react-app my-app
  • Replace my-app with your project name. This command sets up a new React project with all the necessary files and dependencies.

3. Start the Development Server:

Navigate into the project folder:

cd my-app

Run the following command to start the application:

npm start

Your React app will be running locally at http://localhost:3000.


Understanding React Components and What is React JS

React applications are built with components. Components are small, reusable pieces of code that describe part of the UI.

Example: A Simple Functional Component

// Greeting.js
import React from 'react';

function Greeting() {
  return <h1>Hello, Welcome to React!</h1>;
}

export default Greeting;

This Greeting component returns a simple heading. To use it in your main app, you can import and render it as follows:

// App.js
import React from 'react';
import Greeting from './Greeting';

function App() {
  return (
    <div>
      <Greeting />
    </div>
  );
}

export default App;

Functional vs Class Components

  • Functional Components: These are simpler and are written as JavaScript functions. They became widely used after React introduced Hooks, allowing for state and lifecycle features.
  • Class Components: Written as ES6 classes, they were originally the only way to handle component state and lifecycle methods before Hooks.

State and Props in React

  1. State: A component’s state is an object that holds dynamic data. When state changes, React re-renders the component to reflect the new state.
import React, { useState } from 'react';

function Counter() {
  const [count, setCount] = useState(0);

  return (
    <div>
      <p>Current Count: {count}</p>
      <button onClick={() => setCount(count + 1)}>Increment</button>
    </div>
  );
}

export default Counter;

2. Props: Props (short for “properties”) allow data to be passed from a parent component to a child component.

function Greeting(props) {
  return <h1>Hello, {props.name}!</h1>;
}

function App() {
  return (
    <div>
      <Greeting name="Alice" />
      <Greeting name="Bob" />
    </div>
  );
}

export default App;

Best Practices in React

  1. Keep Components Small and Focused: Each component should have a single purpose to make code more readable and reusable.
  2. Use Descriptive Names: Name components based on what they represent.
  3. Avoid Direct DOM Manipulation: Use state and props for any updates instead of directly manipulating the DOM.
  4. Utilize Hooks: Make use of React’s built-in Hooks, like useState, useEffect, and useContext, to manage state and lifecycle events in functional components.
  5. Use Key Props in Lists: If rendering lists, always include a unique key prop for each element to enhance performance.
{items.map(item => (
  <li key={item.id}>{item.name}</li>
))}

Practical Example: Building a Simple Todo List in React

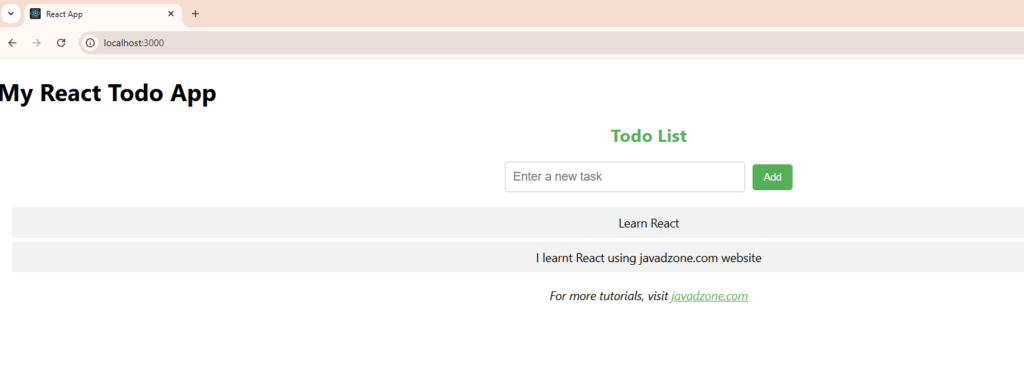
In this example, we’ll build a simple Todo List application to demonstrate how to use state and events in React. Follow these steps to set up and understand the project structure. This guide will help you know exactly which files to create and where to paste the code.

Step 1: Set Up Your React Project

  1. Create a New React App:
    Open your terminal and run:
npx create-react-app my-todo-app

Replace my-todo-app with any name for your project. This command will create a new React project folder with the necessary files.

2. Open the Project: Navigate to the project folder:

cd my-todo-app

Start the development server by running:

npm start

This will open the React app at http://localhost:3000

Step 2: Create a New Component for Todo List

  1. Inside the src folder, create a new file called Todo.js. This component will handle the core functionality of our Todo List.
  2. Add the Following Code in Todo.js: This code creates a simple form where users can add new todo items and displays them in a list.
// src/Todo.js
import React, { useState } from 'react';

function Todo() {
  // State to hold the list of todos
  const [todos, setTodos] = useState([]);
  // State to hold the new todo input
  const [newTodo, setNewTodo] = useState('');

  // Function to add a new todo
  const addTodo = () => {
    if (newTodo.trim() !== '') {
      setTodos([...todos, newTodo]);
      setNewTodo(''); // Clear the input after adding
    }
  };

  return (
    <div>
      <h2>Todo List</h2>
      <input
        type="text"
        value={newTodo}
        onChange={(e) => setNewTodo(e.target.value)}
        placeholder="Enter a new task"
      />
      <button onClick={addTodo}>Add</button>
      <ul>
        {todos.map((todo, index) => (
          <li key={index}>{todo}</li>
        ))}
      </ul>
    </div>
  );
}

export default Todo;
  1. Explanation:
    • State Management: We use useState to store the list of todos and the current input for a new todo.
    • Event Handling: The addTodo function adds a new todo to the list when the “Add” button is clicked, and it also clears the input field.

Step 3: Use the Todo Component in App.js

  1. Open App.js in the src folder. By default, App.js is the main file that renders components on the page.
  2. Import and Use the Todo Component: Add the following code in App.js to include the Todo component we created.
// src/App.js
import React from 'react';
import Todo from './Todo'; // Import the Todo component

function App() {
  return (
    <div className="App">
      <h1>My React Todo App</h1>
      <Todo /> {/* Render the Todo component here */}
    </div>
  );
}

export default App;

3. Save and View:
Save the file, and if your development server is still running, your Todo List app should now appear at http://localhost:3000.

You should see a heading “My React Todo App,” an input field, an “Add” button, and an area where todos will be listed.

What is React JS

FAQs

1. What is React used for?
React is used to build interactive, dynamic, and responsive web applications by simplifying UI development with reusable components.

2. Do I need to know JavaScript before learning React?
Yes, a basic understanding of JavaScript is essential, as React relies heavily on JavaScript concepts.

3. What are React Hooks?
Hooks, introduced in React 16.8, are functions like useState and useEffect that let you use state and other React features in functional components.

4. How is React different from Angular?
While both are used for front-end development, React is a library focused solely on the UI, while Angular is a full-fledged framework offering more structure and tools for building applications.

5. Can I use React with backend frameworks like Node.js?
Yes, React works well with backend frameworks like Node.js to handle the server-side logic and API endpoints.

Thank you for reading! If you found this guide helpful and want to stay updated on more React.js content, be sure to follow us for the latest tutorials and insights: JavaDZone React.js Tutorials. Happy coding!