Managing state in a React application can quickly become complex, especially as your app grows. To tackle this issue, React provides the Context API, a powerful feature that allows you to share state across components without the need to pass props down manually at every level. In this blog post, “Global State in React with Context API,” we will explore how to implement global state management using the Context API, along with practical examples and best practices.
Table of Contents
What is the Context API?
The Context API is a built-in feature of React that allows you to create global state that can be accessed by any component in your application. This is particularly useful for managing user authentication, theme settings, or any data that needs to be accessed by many components.
Setting Up the Context API
To get started, you need to create a Context. Here’s how you can do that:
File: UserContext.js
import React, { createContext, useState } from 'react';

// Create the Context
const UserContext = createContext();

// Create a Provider Component
const UserProvider = ({ children }) => {
  const [user, setUser] = useState(null);

  return (
    <UserContext.Provider value={{ user, setUser }}>
      {children}
    </UserContext.Provider>
  );
};

export { UserContext, UserProvider };
Using the Context in Your Components
Now that you have a Context and a Provider, you can wrap your application with the UserProvider to make the user state available to all components.
File: App.js
import React from 'react';
import { UserProvider } from './UserContext';
import UserProfile from './UserProfile';

const App = () => {
  return (
    <UserProvider>
      <UserProfile />
    </UserContext>
  );
};

export default App;
Accessing the Context
You can now access the user state in any component that is a descendant of the UserProvider.
File: UserProfile.js
import React, { useContext } from 'react';
import { UserContext } from './UserContext';

const UserProfile = () => {
  const { user, setUser } = useContext(UserContext);

  const handleLogin = () => {
    setUser({ name: 'Pavan Kumar' });
  };

  return (
    <div>
      <h1>User Profile</h1>
      {user ? <p>Welcome, {user.name}</p> : <button onClick={handleLogin}>Login</button>}
    </div>
  );
};

export default UserProfile;
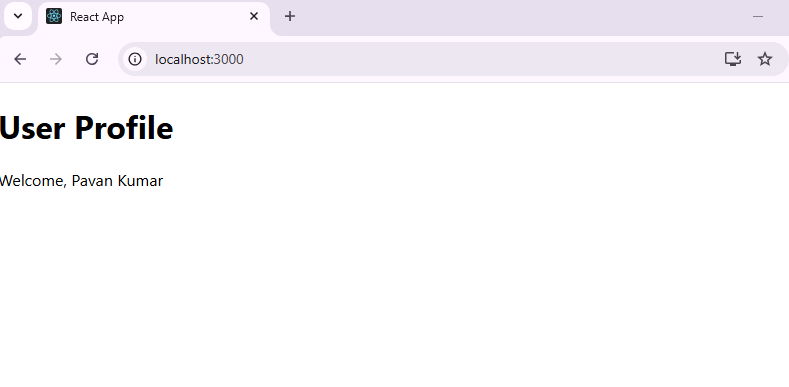
When you click on Login button:
Best Practices for Using Global State in React with Context API
- Limit Context Use: Use Context for data that is truly global. For more localized state, consider using component state or other state management libraries.
- Performance Optimization: Avoid updating context state too frequently. This can cause unnecessary re-renders of all consuming components. Instead, try to batch updates.
- Split Contexts: If you have multiple pieces of state that need to be shared, consider creating separate contexts for each. This keeps your code organized and prevents components from re-rendering unnecessarily.
Advanced State Management with Reducers
For more complex state management, you might want to integrate the useReducer hook with the Context API. This is especially useful when you need to manage multiple state variables or complex state logic.
Setting Up a Reducer
File: UserReducer.js
const initialState = { user: null };

const userReducer = (state, action) => {
  switch (action.type) {
    case 'LOGIN':
      return { ...state, user: action.payload };
    case 'LOGOUT':
      return { ...state, user: null };
    default:
      return state;
  }
};

export { initialState, userReducer };
Combining with Context
Now, you can use this reducer in your context.
File: UserContext.js (Updated)
import React, { createContext, useReducer } from 'react';
import { userReducer, initialState } from './UserReducer';

const UserContext = createContext();

const UserProvider = ({ children }) => {
  const [state, dispatch] = useReducer(userReducer, initialState);

  return (
    <UserContext.Provider value={{ state, dispatch }}>
      {children}
    </UserContext.Provider>
  );
};

export { UserContext, UserProvider };
Dispatching Actions
You can dispatch actions from your components to update the state.
File: UserProfile.js (Updated)
import React, { useContext } from 'react';
import { UserContext } from './UserContext';

const UserProfile = () => {
  const { state, dispatch } = useContext(UserContext);

  const handleLogin = () => {
    dispatch({ type: 'LOGIN', payload: { name: 'John Doe' } });
  };

  const handleLogout = () => {
    dispatch({ type: 'LOGOUT' });
  };

  return (
    <div>
      <h1>User Profile</h1>
      {state.user ? (
        <>
          <p>Welcome, {state.user.name}</p>
          <button onClick={handleLogout}>Logout</button>
        </>
      ) : (
        <button onClick={handleLogin}>Login</button>
      )}
    </div>
  );
};

export default UserProfile;
FAQs
Q1: When should I use Context API instead of Redux?
A: Use Context API for simpler applications where state management doesn’t get too complicated. For larger applications with complex state logic, Redux might be a better choice.
Q2: Can I combine Context API with Redux?
A: Yes, you can use both together. You might use Context API for certain parts of your application while managing more complex states with Redux.
Q3: Is Context API suitable for every component?
A: No, use it for data that needs to be accessed globally. For local component state, prefer using useState.
Q4: How do I optimize performance when using Context?
A: Minimize updates to context state and consider splitting your context into smaller, more focused contexts to reduce unnecessary re-renders.
Thank you for reading! If you found this guide helpful and want to stay updated on more React.js content, be sure to follow us for the latest tutorials and insights: JavaDZone React.js Tutorials. Happy coding!