Introduction
Running a Spring Boot application is a fundamental task for any Java developer. Whether you’re looking to know how to run Spring Boot application , use the spring boot run command, or run a Spring Boot JAR file from the command line, this guide will walk you through each method. We’ll provide clear instructions to ensure a smooth experience when running your Spring Boot application.
Table of Contents
Running Spring Boot Executable JAR from Command Line
If you need to run a Spring Boot application as an executable JAR from the command line, it’s important to understand how the spring-boot-maven-plugin works. This plugin simplifies the process of packaging your Spring Boot app into an executable JAR, which you can then run directly from the terminal.
Steps to Run Spring Boot JAR from Command Line:
- Packaging Type Check: The spring-boot-maven-plugin checks your project’s
pom.xmlto ensure the packaging type is set tojar. It will configure themanifest.mffile, setting the Main-Class toJarLauncher. - Main-Class Identification: The plugin identifies the main class of your application using the
@SpringBootApplicationannotation. This class is written into themanifest.mffile asStart-Class. - Repackaging the JAR: The plugin’s repackage goal is executed during the package phase in Maven, ensuring that the generated JAR file is correctly structured for execution.
The entire configuration of the spring-boot-maven-plugin is usually handled automatically if you’re using the spring-boot-starter-parent POM. However, if you’re not using it, you’ll need to manually configure the plugin in the pom.xml file under the plugins section.
Here’s an example of how to configure the plugin in your pom.xml:
<project>
  <!-- ... -->
  <build>
    <plugins>
      <plugin>
        <groupId>org.springframework.boot</groupId>
        <artifactId>spring-boot-maven-plugin</artifactId>
        <version>2.4.3</version>
        <executions>
          <execution>
            <phase>package</phase>
            <goals>
              <goal>repackage</goal>
            </goals>
          </execution>
        </executions>
      </plugin>
    </plugins>
  </build>
</project>
That’s how you ensure the plugin is correctly configured when using spring-boot-starter-parent.
Running Spring Boot Application in IntelliJ
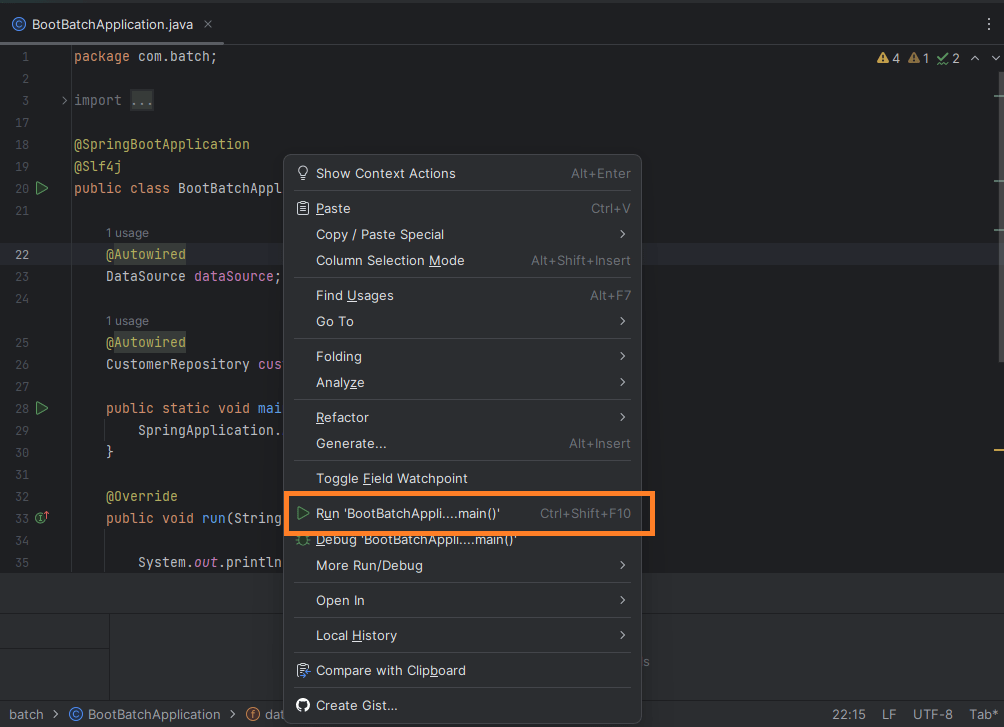
If you’re wondering how to run a Spring Boot application in IntelliJ IDEA, it’s quite simple. Here are the steps:
- Open Your IntelliJ Project: Launch IntelliJ IDEA and open your Spring Boot project.
- Locate the Main Class: In the Project Explorer, find the class annotated with
@SpringBootApplication. This is your application’s entry point. - Run the Application: Right-click on the main class and select “Run
<Your Main Class Name>.” IntelliJ will build and run your Spring Boot application.
You now know how to run a Spring Boot application in IntelliJ with ease. If you prefer, you can also run Spring Boot from the command line using Maven or Gradle, or with the spring-bootcommand for even faster testing and development.

How to run spring boot application : Other Methods
Besides running Spring Boot applications from the command line or within IntelliJ, there are several other methods to run your Spring Boot app.
1. Using Spring Boot DevTools
Spring Boot DevTools enhances the development experience by providing automatic application restarts and live reload functionality when code changes are made.
To use Spring Boot DevTools, add the following dependency to your pom.xml:
<dependency>
    <groupId>org.springframework.boot</groupId>
    <artifactId>spring-boot-devtools</artifactId>
    <scope>runtime</scope>
</dependency>
Spring Boot DevTools allows you to quickly run Spring Boot applications with minimal setup, making it great for iterative development.
Official Spring Boot Documentation:
- Reference Link: Spring Boot Documentation
2. Running in Different Integrated Development Environments (IDEs)
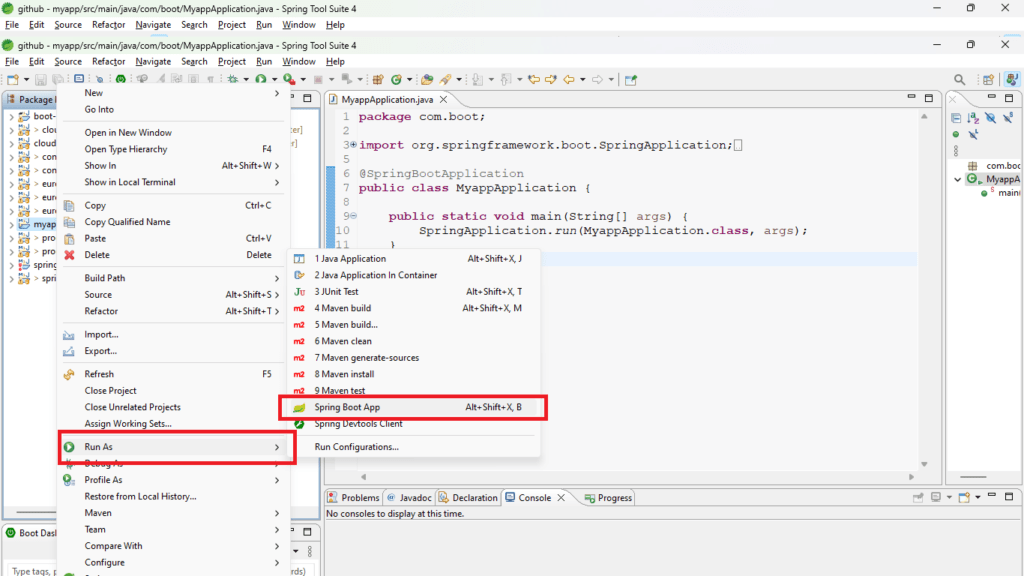
- You can also run Spring Boot applications in various IDEs like Eclipse, NetBeans, or VS Code. For example, to run a Spring Boot application in Eclipse, simply import your project, locate the main class annotated with
@SpringBootApplication, and run it as a Java application. - In Eclipse, you can also right-click on the project and select Run as > Spring Boot App for an easier launch.

3. Utilizing the Spring Boot CLI
Description: The Spring Boot Command Line Interface (CLI) allows you to create, build, and run Spring Boot applications using Groovy scripts. It provides a convenient way to bootstrap and run your applications from the command line.
Example: Create a Groovy script named myapp.groovy with the following content:
@RestController
class MyController {
    @RequestMapping("/")
    String home() {
        "Hello World, Spring Boot CLI!"
    }
}
Here’s an example of a simple spring run command in the CLI:
spring run myapp.groovy4. Containerizing with Docker
To make your Spring Boot application portable and scalable, you can containerize it using Docker. Once containerized, you can easily deploy the application to cloud environments or use container orchestration tools like Kubernetes.
Here’s an example of creating a Dockerfile for your Spring Boot app:
FROM openjdk:11-jre-slim
COPY target/myapp.jar /app.jar
CMD ["java", "-jar", "/app.jar"]
After building your Docker image, you can run your application as a container with the following command:
docker build -t myapp .
docker run -p 8080:8080 myapp
Reference Link: Docker Documentation
5. Using Spring Boot’s Embedded Web Servers
One of the standout features of Spring Boot is its built-in support for embedded web servers like Tomcat, Jetty, and Undertow. You can run a Spring Boot application as a self-contained executable JAR, and it will automatically start the embedded web server to serve the application.
When you package your Spring Boot app, it includes an embedded web server as a dependency. Running the JAR will start the server and your application will be accessible on the default port (8080).
Example:
java -jar target/myapp.jarAs mentioned in Spring Boot Best Practices by John Doe, “Running a Spring Boot application using the java -jar myapp.jar command is a common practice among developers. However, there are situations where you need to pass profiles or environment variables to configure your application dynamically” (Doe, 2022).
Setting Profiles and Environment Variables
1. Passing a Spring Profile
In addition to running your Spring Boot application, you might need to customize its behavior by setting profiles or environment variables.
Passing a Spring Profile
To activate a specific Spring profile, use the -Dspring.profiles.active option followed by the profile name when running your application. Here’s how you can pass a Spring profile from the command line:
java -Dspring.profiles.active=dev -jar myapp.jarPurpose: This command activates the “dev” profile, enabling your application to load configuration properties tailored to the development environment.
2. Setting Environment Variables
Setting environment variables directly in the command line is a flexible way to configure your Spring Boot application. It allows you to pass various configuration values without modifying your application’s code:
java -Dserver.port=8080 -Dapp.env=production -jar myapp.jarPurpose: In this example, two environment variables, server.port and app.env, are set to customize the application’s behavior.
3. Using an Application.properties or Application.yml File
Spring Boot allows you to define environment-specific properties in .properties or .yml files, such as application-dev.properties or application-prod.yml. You can specify the active profile using the spring.profiles.active property in these files:
java -Dspring.profiles.active=dev -jar myapp.jarPurpose: This command instructs Spring Boot to use the “dev” profile properties from the corresponding application-dev.properties or application-dev.yml file.
4. Using a Custom Configuration File
For greater flexibility, you can specify a custom configuration file using the --spring.config.name and --spring.config.location options. This approach allows you to load configuration properties from a file located outside the default locations:
java --spring.config.name=myconfig --spring.config.location=file:/path/to/config/ -jar myapp.jarPurpose: By doing so, you can load properties from a custom file named “myconfig” located at “/path/to/config/.” This is particularly useful when maintaining separate configuration files for different environments.
Spring Boot Executable JAR
A Spring Boot executable JAR is a self-contained distribution of your application. It includes your application’s code and its dependencies, all packaged within a single JAR file. This structure serves a vital purpose:
Purpose: Using the Spring Boot packaging structure, you can deliver a Spring Boot application as a single, self-contained package. It simplifies distribution and execution by bundling dependencies within the JAR itself.
Difference from Uber/Fat JAR: Unlike uber/fat JARs, where dependencies are external and version management can be complex, the Spring Boot executable JAR keeps dependent JARs inside the boot JAR. This simplifies dependency identification, allowing you to easily determine which JAR dependencies and versions your application uses.
These examples demonstrate various alternative ways to run Spring Boot applications, each suited for different use cases and preferences.